Showing posts with label creating. Show all posts

Wednesday, January 1, 2014

Happy New Year & a Recipe

Homemade Elderberry Syrup
It is the first day of 2014 and I feel hopeful anticipation for the year ahead. I don't know why but I like the clear line of a new year and a fresh start. Each day we have this opportunity, the chance to begin again, to breathe in the possibility, to bear witness to life unfolding around us and the life unfolding within us but on New Years day it feels even more significant to me.

Today I began my day at my work table in our shared office/guest bedroom with a cup of coffee and my journal.  I wrote about purpose, what I think mine is and how to live it in this coming year.  Part of that purpose is healing, myself and others, and part of that purpose is sharing.  The sharing part is often hard for me as I second guess myself and concern myself that others will say "on what authority is she saying this". The truth is most of what I share is universal knowledge though, shared as seen through my own experience. In alignment with my desire to live my purpose, and to heal and to share, today I am sharing a recipe for Elderberry Syrup.

I learned about Elderberries last year when I attended one of several local herb classes.  The owner of the farm and teacher of the class mentioned making homemade elderberry syrup for the cold and flu season. The elderberry comes from a small tree/bush and is well known in the herbal community for its ability to boost the immune system preventing and shortening the length of the flue and colds. They are a rich source of bioflavonoids and antioxidants as well as the nutrients potassium, beta carotene, calcium, phosphorus and vitamin C.  

It is so funny how once you hear about something of interest, all of a sudden you see and hear about it all around you. I soon found dried elderberries in my favorite local health/grocery store when looking in their bulk section and even purchased a syrup from this store as well when I was sick and looking for homeopathic solutions.

As Alan has been fighting a cold for 2+ weeks and I felt the symptoms beginning myself,  I decided to try making the syrup myself using a recipe from Mountain Rose Herbs. I cut the recipe in half as I purchased the elderberries locally and the store I shop at was running low. After seeing a display of organic elderberry syrup for $21, buying the small amount of dried berries and cutting the recipe in half was a no-brainer.  I was low on honey and bought a huge jar for $16 but the organic dried elderberries, cloves, and cinnamon sticks were less than $2.00 total. Even if you don't already have honey on hand this is still a very economical recipe as it produces a lot of syrup (3.5 cups).  Some people really love the flavor of the syrup and add it to everything from pancakes to oatmeal but I find it a bit medicinal and am still getting used to it. I think next time I may omit the cloves.  Although the cloves and cinnamon may be used as a natural preservative so I need to do a bit more research first.

Ginger, Raw Honey, Elderberries, Cinnamon, and Cloves

Here is the recipe as found on Mountain Rose Herbs site.  As I mentioned, I cut the recipe in half and it still produced approximately 1.5 cups of syrup.

Please note that elderberry is not safe for pregnant or nursing women, that you should do your own research before taking any types of herbs to ensure that they do not interact with any conditions you have or medications you may take and that honey is not appropriate for children under the age of 2 years old.

Elderberry Syrup Recipe


- 1 cup fresh or 1/2 cup dried organic Elderberries (harvest blue or black, avoid poisonous reds)
- 3 cups water
- 1 cup raw local honey
- 1 organic Cinnamon stick, 3 organic Cloves, and organic Ginger (optional)
Place berries, water, and spices in a saucepan. Bring to a boil, reduce heat, and simmer for 30 minutes. Smash the berries to release remaining juice and strain the mixture. (discard cooked berries/cloves/ginger/cinnamon) Allow liquid to cool and stir in honey. Will last for 2-3 months stored in the fridge.

Hope you have a Happy and Healthy 2014!


Tuesday, February 5, 2013

Homemade Almond Milk


I have wanted to make homemade almond milk for a while now and finally took the leap a few weeks ago.  I have since made several batches and while I am still practicing with the amount of water used, flavorings, and the processing method, overall I am pleasantly satisfied with the results!

I love my coconut milk smoothies but wanted to change things up a bit and all of the store bought almond milk I have found seems to have a few more ingredients and additives that I am not interested in.  The method below is just filtered water and almonds along with spices or flavorings of your choice. 

After reading that soaked and sprouted nuts and seeds are better for you (you can read about the reasoning behind this here, and here)  I soaked my raw almonds for 24 hours before using them in the almond milk.

Homemade Almond Milk

You will need the following
  • 1 Cup of Soaked Almonds, rinsed and drained (Almonds were soaked for 24 hours in 4 cups of water and then drained, rinsed, and drained again)
  • 3-4 Cups of Filtered Water (Less water equals a richer and creamier milk)
  • Metal Strainer, Cheesecloth, or Nut Bag
  • Blender
  • Containers for storing finished product
Optional Flavorings
  • Vanilla Extract
  • Cocoa
  • Ground Cardamon
  • Cinnamon
  • Dates
  • Honey
  • Maple Syrup
Place almonds and filtered water in blender and process on high until well blended and frothy.  Place the strainer you are using over your storage container (I used a metal strainer and mason jars) and pour the almond milk into the strainer.  You will likely have to do this in batches as the by-product of the milk is almond meal which will build up in the strainer and need to be emptied.  Once all of the milk has been strained, you can add the milk back to your cleaned blender and add flavoring of your choice.  Experiment with this and see what you like.  My favorite blend so far is Almond Milk with Vanilla, Cinnamon, and Cardamon (V.C.C).  I used a pinch of cinnamon, a pinch of cardamon and a few drops of vanilla per cup of finished milk.  I would advise to start off with very small amounts of flavoring as to not take away from the great taste of the milk itself.  The first batch I made I used honey and did not like how sweet the milk tasted by itself but loved it in smoothies.  The milk stores in the refrigerator for up to 4 days. The milk will separate after mixing and should be gently shaken before serving.  I also froze a few batches in small jars with great success.


Soaked almonds prior to draining and rinsing

Almonds with and without skins
When I made almond milk for the first time, I made one batch with skins and one batch without skins.  I could not tell any difference in taste so I have made all other batches with skins on.

Metal Strainer and Mason Jar

Almond Meal by-product emptied from strainer

Final Product-Rich and Frothy Almond Milk

Thursday, October 4, 2012

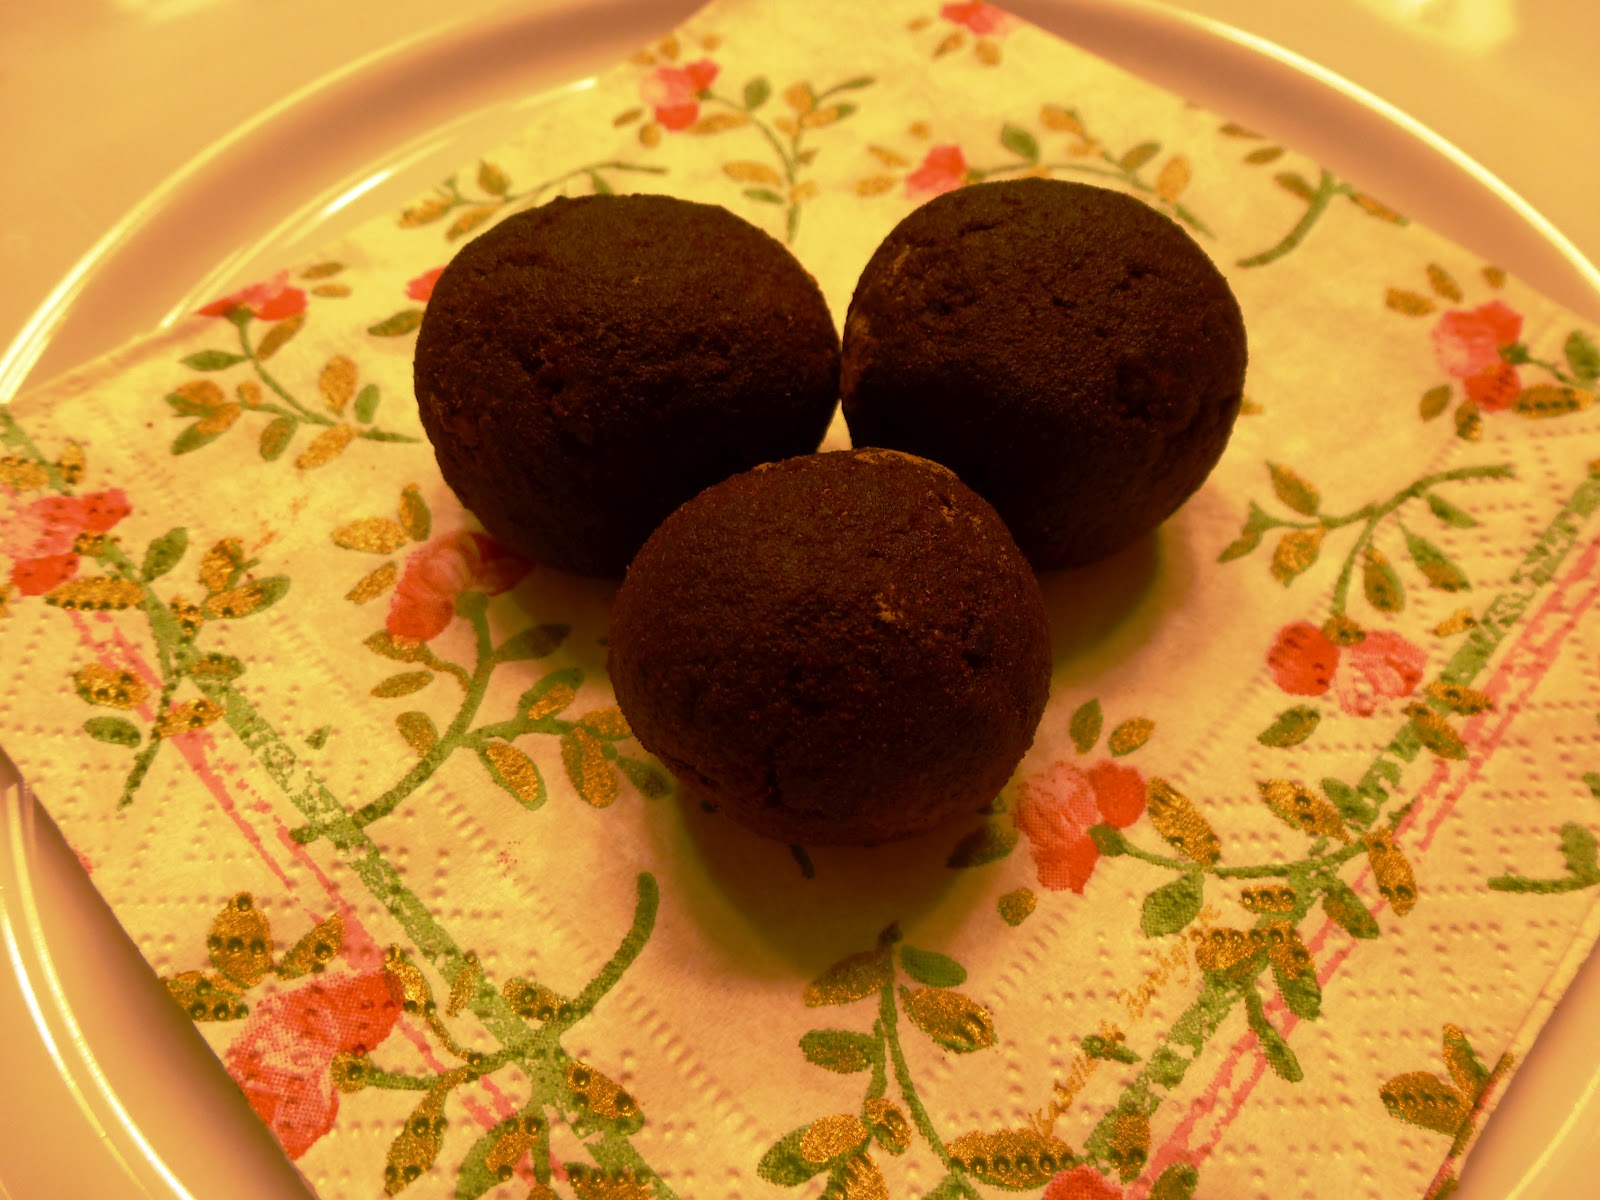
Day Four: Favorite Things-Cinnamon Dusted Truffles-AKA Energy Balls

Cinnamon Dusted Truffles
Around here I refer to these as energy balls but truffle comes closer to the decadence of these little treats.  Packed with protein and good fats, these are my go to snack. Plus the Cacao is packed with magnesium and iron.  If you are new to Cacao you can find it at places like Whole Foods, the Healthy Home Market if you live in Charlotte, NC, or likely at your local health food type store.  The recipe below is my adaptation from a recipe I found two years ago on the blog The Byrdfeeder.

I hope you enjoy!!

Cinnamon Dusted Truffles
Yield:  35-40 Truffles

2 cups chopped raw walnuts
1/2 cup raw cacao nibs
1 cup organic raisins
4 tablespoons Almond Butter (salted or unsalted)
1 pinch fine sea salt


2-3 tablespoons of cinnamon (for coating)

Mix all the ingredients together in a food processor.  I don’t have a food processor myself so I mix the nuts, raisins, cacao and sea salt in small batches in the blender and then hand adding in the almond butter in a medium bowl.

After combining all the ingredients, I then hand roll the mixture into quarter sized balls and place on a baking sheet covered in wax paper.  Once all the truffles have been rolled I fill a small ramekin with the 2-3 tablespoons of cinnamon and roll one truffle at a time, gentling shaking the ramekin back and forth causing the truffle to roll round and round and coat itself in cinnamon.  The truffles will begin to darken to a nice espresso color as the oils from the truffle combines with the cinnamon.
 
Place all truffles back on the wax paper lined cookie sheet and place in the freezer for about 30 minutes. 

I then divide the truffles into two containers; one for the refrigerator and one for the freezer.  These keep in the refrigerator for approximately 2 weeks and in the freezer for 6 months, although to be honest I doubt they will hang around your house that long!
If the mix is to wet you can add more nuts to get a drier consistency.

If the mix is too dry you can add more almond butter.

If you are not fond of cinnamon, cocoa powder or fine shredded coconut are also wonder coating choices.

Based on the nutritional data on the packages of ingredients I used, I broke down the nutritional information below.

Food
Calories
Fat
Carbs
Protein
Sugars
Walnuts
1600
160
24
40
0
Raisins
1040
0
248
8
232
Cacao
520
48
40
16
0
Almond Butter
760
68
24
32
8
Total
3920
276
336
96
240
# Energy Balls
33
33
33
33
33
Nutrition
Per Each
119
8
10
3
7

In-Process Photos
Ingredients
 
Before Processing
 
Ready for the Cinnamon

Monday, October 1, 2012

Fourteen Going on Forty

My younger self that I have been thinking of as of late
It is October 1st and exactly 14 days until my fortieth birthday.  I want to celebrate these last 14 days of my thirties.  It feels like a big deal to me.  Not the kind where I want a surprise party or a trip around the world (but hey the trip would be cool), but the kind where I think it is important to stop and take note and stock of where I have been and where I am. 

I thought of creating a life-list of 40 things to do before I turned 40 but I thought of it shy of 40 days.  I mean I knew this was the year it would happen but my-oh-my how time has a way of creeping up on you.  So then I thought, ok , I can do 22 things (because that was about how many days ago it really hit me) before I turn 40 but that felt daunting and more of a challenge rather than a celebration.  So I think I will just share parts of myself, some of my favorite things so to speak, for the next 14 days.  And this sharing will help with something else I want to let go of or rather make peace with and that is fear. 

Yes I have a blog which feels big and wide-open in some ways.  In truth it is just a glimpse of who I am based on my the parts of me that I choose to reveal.  And I have not told many people about said blog. When I explore the why behind that (not sharing it with many people) the answer is fear.  Fear of rejection, judgement, ridicule, frivolity, etc.

Fear can be healthy and keep us safe.  Fear can propel us forward with much needed adrenalin.  Or fear can allow us (me) to be mediocre.  Not risking too much because it might hurt and therefore remaining stagnant because it feels better.  Only stagnation doesn't feel better.  Fear can also tell tall-tales and create mountains out of mole hills and let us worry and over think things so much we forget what we were even fearing to begin with.  Whew. 

So with that in mind, I will begin sharing 14 things, something new each day, until I turn 40. I am not sure what each day will bring, but we will see.  This will be a gift to me, chronicling my life and favorite things while leaning into my new year, and hopefully if you decide to join along, a gift to you as I share a few things you might like to explore for yourself.

Today maybe you can think of something that you fear and explore where it comes from. Is it an old story about yourself that may no longer be true but that you are clinging to because it is familiar?  Some of my fears are old stories that I am slowly re-writing. There is this story about a nerdy girl who never did quite fit in.  She didn't have the right accent, or the right clothes, or the right friends.  She was too tall and her eyes were too big and people laughed at her and called her names. She decided it was easier to be quiet and observe and try to go as unnoticed as possible until the most precious parts of her almost dissapeared.  That is part of one of my old stories. There is also beauty in that story.  Part of re-writing my stories is also looking for the shiney in the dullness.  My quietness has lead me to be an observer and to relish the connectivity with the natural world as it embraced me when I felt alone in so many other areas of my life.

Maybe you have a story you would like to re-write as well. 


Wednesday, September 5, 2012

Map Table

Map Table~Barcelona
I have long loved maps, a love likely developed while living with my grandparents where National Geographic magazines, The World Atlas, and travel maps were always readily available as reading material.  They loved to travel and visited almost every state within the US in addition to visits to Canada. 

On all of our trips we not only use maps to get to know and to get around the city, but I hoard them almost as much as stones and sea shells.  Each map has something different; some are hand drawn, some include famous sites, some are enlargements of particular parts of a city, some are colorful like a metro map, and some are black and white, but each are unique and have their own story to impart.  The idea to create a collage of our maps, ticket stubs and other paper ephemera has been ruminating since our honeymoon.  I often take these saved items out of the boxes I keep them in and arrange them in different fashions looking for something to speak to me on how to display and arrange these treasures.  There are also coins mixed in amongst the papers and each of these shiny jewels get added to the lot or sometimes lined up in an orderly fashion with the idea to mat and frame just the coins.

Well an opportunity arrived and while it was not the collage I imagined or even the map I originally intended to use, I was pleased with the outcome and the new display for this map.  We rented our condo out for the Democratic National Convention and I needed a bedside table for our guest bedroom.  I had several inexpensive round plywood tables that are intended to be covered in a tablecloth and then topped with glass and decided to try using one of these for my project.

The steps for creating the table are below.

  • Using the glass table top as my template with the map placed underneath the glass I used a sharp razor knife and cut around the glass.
  • Since the table was unfinished I sprayed it and the legs with one coat of primer and sanded the rough edges after it dried.
  • After removing the sanded dust I coated the wooden table top and bottom (covering the metal areas where the legs are inserted with painters tape) and legs with white oil paint.
  • After the paint dried I applied Liquitex varnish to the table top and the round cut out map and carefully placed the map on the table top smoothing out air bubbles as I went.  I did have a hard time with some of the air bubbles and had to gently pierce the paper where they appeared with the razor knife and then push the paper down.  I would recommend a brayer or other type of roller to ensure all air bubbles are removed.
  • After the map was attached to the table, I covered the map and wooden edges around it with the same Liquitex varnish, sealing it and giving it a shine.
  • I purchased small silicone disks from our local home improvement store and attached 4 of these to the glass to separate the glass from the table, protecting the map and providing a sturdy base for the glass.
I didn't take many "in process" shots but did take this one when I first cut the map and prior to painting the table.

Tuesday, July 12, 2011

A Recipe

Ever since tasting a wonderful tomato pie several years ago at Mozelle's, a local restaurant, I have been wanting to try to make one of my own.  With tomatoes coming in now and another tomato lover inviting me to the beach, I thought our beach trip would be the perfect opportunity to try out a recipe I found.  I mean tomatoes and cheese in a pie...what could go wrong with that?  Nothing!  It was heavenly. 

There are not any pictures of the pie that we made as I still have not quite got the hang of taking pictures of food that looks good. I did however take a picture of the beautiful tomatoes that were used to create the pie, and the link to the recipe shows a picture that looks just like the one we made.  It is one rich pie and could be served as a hearty appetizer or as a meal with a small salad.   I hope you enjoy it!

PS....We used a frozen store bought crust instead of the homemade one listed and used extra cheddar and monterey jack cheeses in place of the fontina cheese.

Heirloom Tomato Pie With Black Pepper Parmesan Crust
serves 6

for the crust
1 ½ cups all-purpose flour
1 tsp salt
2 tbsp fresh grated parmesan
2 tsp coarsely ground black pepper
10 tbsp cold unsalted butter, cut into small chunks
1/3 cup ice water

for the filling
5 heirloom tomatoes, sliced, salted and well drained*
½ cup mayonnaise
½ cup sharp cheddar cheese, grated
½ cup monterey jack cheese, grated
¼ cup fontina, grated
10-12 basil leaves, chopped
1 bunch of chives, chopped
salt and pepper

*To avoid a case of pie soggy bottom, the tomatoes need to drain on a metal rack for about an hour.

Preheat the oven to 350 degrees. To make the crust, combine the flour, salt, parmesan and black pepper in a food processor. Pulse a few times to combine. Add the butter, and pulse until the mixture’s largest chunks are about pea sized. With the food processor running, slowly drizzle the ice water through the feed tube until the dough starts to form a single ball. Gather the dough together and place on the center of a piece of plastic wrap. Cover and shape into a small disc. Chill for at least 30 minutes in the fridge. Remove dough from the fridge, and allow to sit on the counter for about 15 minutes. Flour your rolling surface, and gently roll the dough out into a 12-inch circle. Drape the dough over the rolling pin and transfer to a 9-inch pie dish. Trim the edges and pinch into a decorative design. With a fork, poke holes in the bottom of the entire crust. Place a piece of parchment paper into the center of the pie dish with the edges gathered so as to not touch the edges of the crust. Place enough dried beans or pie weights onto the foil to just fill the bottom. Bake the pie crust for 15 minutes, remove paper and pie weights and allow to cool.

To assemble the pie, mix the mayonnaise, cheddar and Monterey Jack cheeses in a small bowl. Season with salt and pepper. Layer the tomato slices, basil and chives to the top of the cooled pie crust. Spread the cheese mixture on top of the tomatoes. Sprinkle the fontina on top, and bake for 30 minutes until the cheese has completely melted. Allow the pie to cool slightly before cutting.

Tuesday, June 14, 2011

New Painting


Blue Feather
I painted this feather last week but finished putting a glaze on it yesterday afternoon.  Michael's (craft store) was having a sale a few weeks ago and I bought several square canvases and this is one of them.  I intended to paint blue and green swirls on a yellow and gold background but I ended up with this instead.  The yellow, gold and green are there but hiding under the silver.  This painting reminds me of a peacock feather which reminds me of my grandmother and also of my favorite colors (blue, green, and gold).  I did, however, leave out the golden eye that is more typical of a peacock feather.


Paintings in progress

I have 4 other paintings in process as well, each quite different from the next.  I seem to be in a blue phase these days when it comes to painting but I am also very drawn to petal pink and this apricotish yellow as well.  I am craving crimson red for a future painting and think I will splurge on the one little tube I have or experiment in making a crimson red from my other paints.

Monday, June 13, 2011

A Brand New Day

Bee balm blooming in my garden
Wow, it has been a while since I did the last blog post.  Between feeling kind of off kilter (something is going on in the cosmos), helping plan for my niece's graduation party (it was so much fun) and looking for a new home (anyone have a miniature violin to play for me) I just have not felt up to writing a post.  When I think about it though it mainly goes back to feeling off kilter and not wanting to complain. Why should I complain when I get to spend my days generally doing what I want and at the pace I want?  What is there to complain about, right?   

There has been this crazy question running through my head for two weeks now (longer really but I chose to acknowledge the question within the last two weeks) that is also adding to this off kilter feeling that I am having. It is some variation of What are you doing with your life or What are you going to do with your life or Who are you going to be when you grow up....I keep responding I like what I am doing now and I keep hearing my inner thoughts tell me that this is just a break, not a way of life.  Then my mind skit-daddles down this slippery slope where I berate myself for having six months off from work and not having figured this out yet and for not having created a sustainable stream of income doing this (living, creating a life, gaining strength).

When these thoughts come up and steal my breath like a sucker punch to the gut I try to regain my breath and my footing.  And in my mind I stand up a little taller and plant my feet firmly hip width apart and tell myself this: You are exactly where you should be and This is not a race you are running but a life you are creating and Step by step you are building and creating it and adding and subtracting to it.  I remind myself that I really do get to make this up as I go along and there is no secret formula but a mixture of laughter and tears and a pinch of humility and hopefulness among other things all rolled together.  Breath in, breath out. All of this helps me not to give up and to give in. 

Could I concentrate more on one of the many things that I am doing these days?  Yes, I could.  But I really do believe that all of this together is the current formula I need and is adjustable.  I am enjoying painting and writing and gardening and cooking and being a personal assistant of sorts to name a few things.  I do want to concentrate more on the writing, however I have felt a little too fidgety for writing lately and have allowed that restless energy to pour into other areas  that needed attention. 


More than anything I am practicing (another great word for trying) finding the possibility and potential in each day and finding my internal rhythm.

Friday, May 27, 2011

Seahorses~Framed

Seahorses framed
I finally finished framing the Seahorses and hung them yesterday afternoon.  I just love walking into the bedroom and seeing them, especially since the wall above our bed had been empty after I painted the walls and decided the last painting no longer fit. 

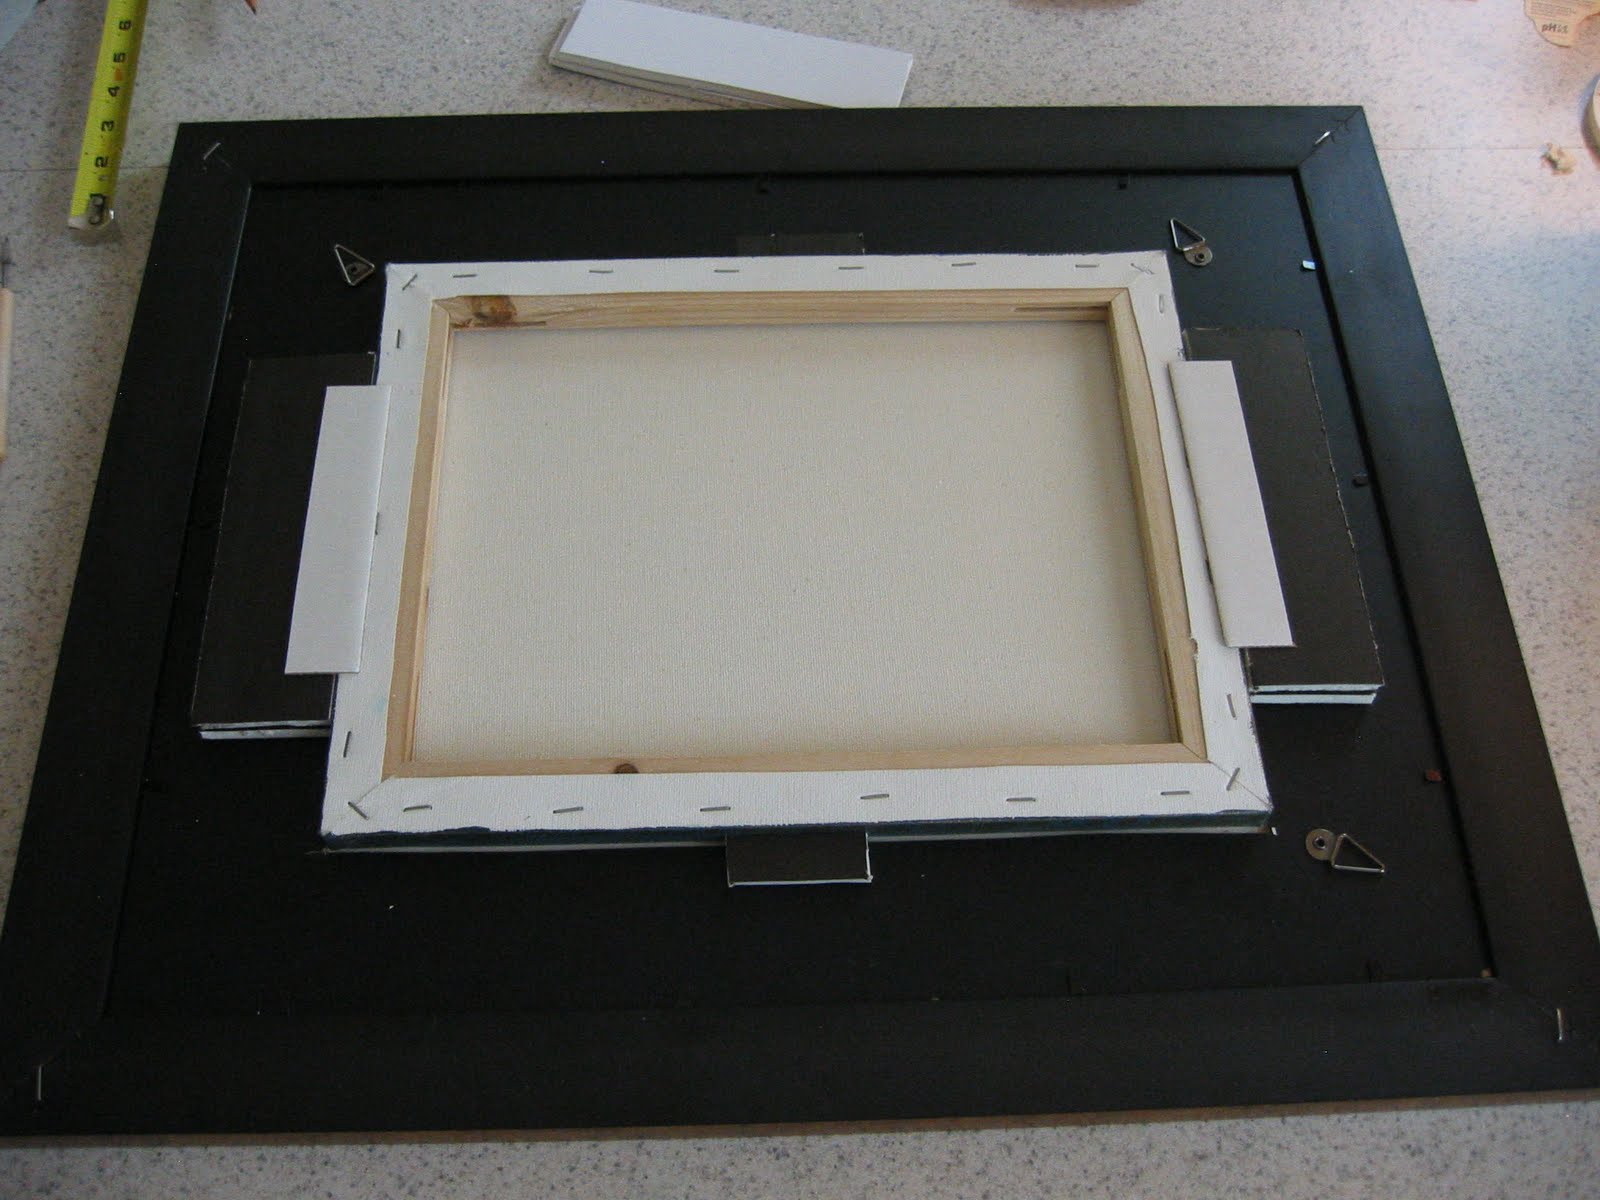
The framing technique is likely unconventional but thankfully with my husbands engineering mind and talent with a razor blade combined with my ingenuity this came together.  Basically these are standard frames purchased with matting.  The back of the frame was cut out to insert the canvas and then I bought foam board and used double sided mounting tape to secure the foam to the back of the frame and create a lip to hold in the canvas.  I then covered the entire back with brown craft paper using thin double sided tape.  Here are a few pictures.

Back of frame showing foam stabilizers 

Back of frame with paper

Female framed
The verdict is out as to whether or not the paint will go funky (not sure of the proper term) because of being enclosed in glass but I did cut a triangle in the backing paper so the canvas could breath.  I did a lot of research on the internet and there were mixed results as to whether or not an acrylic painting should or can be covered in glass.

Has anyone else framed their acrylic canvas paintings and have tips they want to share?

Wednesday, May 18, 2011

Here Comes the Sun


My Desk

Today is cloudy and drizzly, one of those days where it could be morning, noon or early evening because it is just grey.  It is also green though and misty and delightful in a spring into summer kind of way. It is one of those days where I seem to putter here and there doing little bits of this and that.
 
After taking Butters out into the morning rain I decided to take out most of the house plants and put them on the front walk for a fresh soak and misting. After coming back inside I made a pot of strong coffee and folded one load of laundry, dried another, and stripped the bed linens to be washed.  Then I thought today would be a great day for banana oatmeal, but decided to do some stretching first.  Running and walking on the treadmill pounds out the grumpies but it also seems to leave my joints in knots.  A good stretch of my entire body was definitely needed. I stretched and did some gentle yoga to work out the kinks. It felt good to move my body in this way and be aware of its strengths and limitations and loosen it up a little more with each exhalation.

After stretching I did treat myself to banana oatmeal.  I make the oatmeal first and then add sliced bananas and cook it a few minutes longer.  The heat seems to bring out the sweetness in the bananas.  I added a dash of cinnamon and topped it with milk and walnuts.  I actually think I prefer pecans but we were out of those.
 
While I ate my oatmeal I caught up on e-mail and blog land and read a bit from The Book of Awakening. In the back of my mind while reading I kept thinking to myself "you need to do something creative today".  The response I got back was "but it is cloudy today and I don't create on cloudy days".  The more I thought of this the more I remembered that if I always waited for the perfect circumstances I would never get anything done.  And then I thought "well then why not paint your own sunshine".  So that is the plan for a new painting.  I really would like to try an intuitive painting approach and maybe I can dabble with that today as well.  I really feel like I have to know what I plan to paint before I sit down and get to work.  I am inspired by several artists whose blogs I frequent that paint intuitively.  They approach the canvas with the thought that "I am going to paint and see what appears" and just amazing things happen and show up on their canvas.  It is quite beautiful.  Anywho, today I am going to create some sunshine and perhaps I will start another canvas where I just play and see what happens.


I hope you are having a wonderful day today and creating some sunshine of your own.

Tuesday, February 8, 2011

Spilling Truth

The truth is
that I had dreams for this room.
I had dreams for every room
that included little voices,
and little feet
that have not yet joined me in this world.

In packing and sorting and purging
I am spilling over with the truth of
what is not
and what may never be
and what was
wished for and wanted.

The truth comes spilling
down my cheeks
in salty rivulets
that make it hard to
remember or
realize or
even understand and accept
that the universe is unfolding
exactly as it should be.

And so I will create.
What I can.
What I am given and allowed.
In place of that
which is barren.